
About nine years ago I used some birthday money to buy several instructional origami books – one of those books was about origami dinosaurs. I had plans to make a mobile with dinosaurs one day and I thought having a book like this might come in handy. Well, it only took nine years but I finally got a request for a dinosaur mobile last month. I was super excited because now I had the chance to use the book I bought!

A recent customer asked if I could make her another giant mobile, but this time with dinosaurs instead of paper cranes. I figured, I have a dinosaur book that I can use, why not take this opportunity to make a dinosaur mobile? I was going to get paid for trying something new – I doesn’t get better than that! She sent me a picture of a DIY paper crane mobile that she had found online and asked if I could use a similar color palette. It was a mobile with paper cranes in all sorts of blues and greens.
Finding the Right Resources
I got out 6×6 inch sheets of origami papers in blues and greens, and settled in to fold dinosaurs. I grabbed the book I had been so excited to use, and started flipping through the pages. It didn’t take long to realize that there wasn’t a single useful model in the entire book. Most of the instructions required that you use two or more sheets of paper in order to make a single dinosaur, and many of them required that you cut the paper to be able to achieve certain folds. These factors alone wouldn’t normally deter me from folding and using these models. Origami purists don’t believe in cutting and using multiple sheets of paper, but it doesn’t always bother me. If a model looks good, and functions the way I need it to, I am willing to use it in my work. But in this case, the use of multiple sheets and cutting left the models looking flimsy and awkward. Quite disappointed that the book I had kept for so long was completely useless to me, I turned to another source of origami instructions – my go to site for diagrams – Origami Resource Center.

Online Resources for Origami
Whenever someone requests a creature or thing I have never folded before, Origami Resource Center is usually the first site I visit in order to find instructional diagrams for origami models. Now, before you go off and click on every link on their site, be aware that a few of the links are broken, and those may take you to sites where you can get malware on your computer. That actually happened to me, and I had to download a program to find and remove the malware from my computer. Despite the malware, I found some awesome dinosaur diagrams that I could use.
How I Decide on the Origami Models to Include
I usually stick to models that are simple and straight forward, while accurately portraying the item or creature I want. There are times when a simple model just won’t cut it, and I usually have 3-5 more complex models in each custom mobile I make. The Triceratops and Tyrannosaurus Rex just couldn’t be simple models in this mobile. They needed to be extra special, as they would be the stars of the mobile.

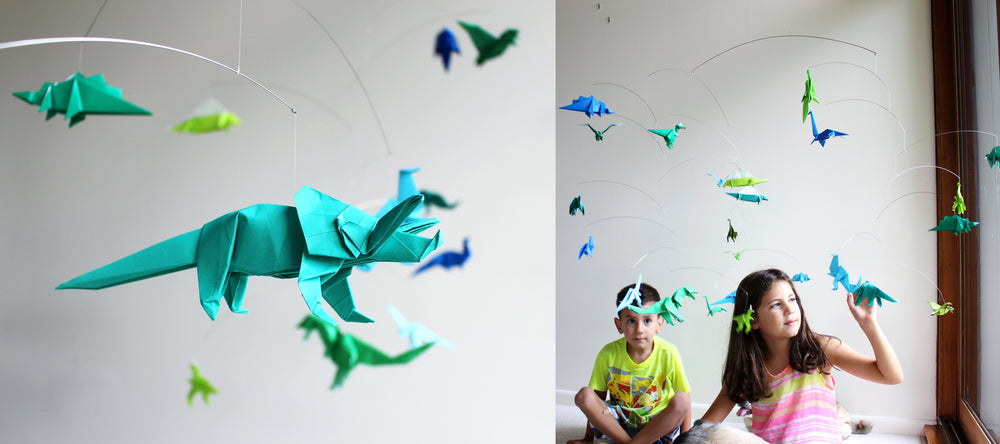
After some discriminatory searching, I finally settled on two diagrams I liked. To fold the T-Rex and Triceratops took roughly 40 minutes each – a bit on the lengthy side if you ask me, but it was my first time folding them. Each origami dinosaur I folded for the mobile turned out a different size – something that obviously doesn’t happen when you fold identical paper cranes. This complicated matters, as I had to arrange the models by size. In order to fill in the size gaps I had to figure out which models I could fold from which size sheets in order to result in the final model sizes I needed. I decided to put the largest models up high, and further away from the viewer, and the smaller ones closest to the viewer, with one exception. The T-Rex, Triceratops, and a large Mononykus would be paired up with much smaller dinosaurs at the very bottom of the mobile. This worked well because you could see and better appreciate the detailed folds on these larger models.
The Assembly Process
 After all 24 models were folded, I took a few phone pictures of the dinosaurs hanging out, and started to put the whole thing together. I always use a tray to work on because it’s easy to move from place to place and put away when I’m not working. This tray is a bit small for assembly of the giant mobile, but I made it work, and after some tweaking here and there, the mobile was complete. The final product was so impressive that even my husband was sad to see it get shipped off to its’ new home.
 Since the completion of the first dinosaur mobile, I have had two more requests for them. The one I’m currently working on has red, orange, yellow, green, and blue dinosaurs. It will be a 1 year birthday gift for a lucky little boy, and I look forward to seeing how it’ll turn out! The other dinosaur mobile will be a Christmas gift for my nephew who loves everything related to dinosaurs.